как сохранить пользовательское поле в пользовательской таблице базы данных при редактировании продукта из серверной части?
Я создал пользовательский модуль для отображения пользовательской вкладки в форме продукта в серверной части. Я использовал это решение.
Теперь на вкладке я добавляю пользовательские поля для сохранения в пользовательской таблице базы данных.
скажи <input type="text" name="my_new_field" value="123">
Также создан пользовательский контроллер для продукта администратора, сохраненный, как показано ниже.
В etc/di.xml
<?xml version="1.0"?>
<config xmlns:xsi="http://www.w3.org/2001/XMLSchema-instance" xsi:noNamespaceSchemaLocation="urn:magento:framework:ObjectManager/etc/config.xsd">
    <preference for="Magento\Catalog\Controller\Adminhtml\Product\Save" type="Namespace\Module\Controller\Adminhtml\Rewrite\Product\Save" />
</config>
И в Controller/Adminhtml/Rewrite/Product/Save.php
<?php

    namespace Namespace\Module\Controller\Adminhtml\Rewrite\Product;

    class Save extends \Magento\Catalog\Controller\Adminhtml\Product\save
    {

        public function execute()
        {
            echo "hello"; print_r($_POST); die;

            return parent::execute();
        }
    }
Теперь в функции execute я ожидаю значение ПОСТА my_new_field. Но я такой не понимаю этого. После получения этого я буду использовать пользовательские запросы для сохранения данных в пользовательской таблице.
Что я делаю не так или мне следует использовать какой-то другой метод?
Обновление: 26 августа.
Я использовал форму Ajax для сохранения данных с вкладки продукта, так как у меня были ограничения по времени. Я принял ответ @william-oakley. Теперь, когда @mageworx добавил в своем ответе, что это не стандартный способ сделать это.
Я хочу использовать стандартное использование формы пользовательского интерфейса в дальнейшей разработке. Так что мой вопрос в том, как добавить пользовательскую вкладку в редактирование продукта с помощью стандартной формы пользовательского интерфейса и сохранить пользовательские поля в пользовательской таблице или другим способом.
3 answers
Вы можете просто использовать "голое" поле ввода, вам просто нужно добавить следующий атрибут:
data-form-part="product_form"
Итак:
<input data-form-part="product_form" type="text" name="my_new_field" value="123">
Затем вы сможете получить данные POST для ввода.
Приведенное выше решение не является полностью правильным. Вы добавляете поле как "голый" html-элемент, а форма продукта - это форма пользовательского интерфейса со своими особенностями. Специальный класс (vendor/magento/module-ui/view/base/web/js/form/form.js) отвечает за сбор полей и их проверку при отправке формы. Кроме того, этот класс должен пропускать поля, которые не связаны с этой формой пользовательского интерфейса или не additional fields, как и все ваши поля. Вы должны использовать следующие имена, чтобы убедиться, что ваше поле будет отправлено в контроллер:
input type="text" name="product[my_new_field]" value="123"
Но это не совсем правильно, потому что правильное решение состоит в том, чтобы не отклоняться от стандартов использования форм пользовательского интерфейса и использовать его собственные элементы и компоненты. В этом случае вам не стоит беспокоиться об этом, потому что все будет обработано автоматически.
Вы можете проверить основной метод хранения данных форм пользовательского интерфейса, чтобы понять процесс:
/**
 * Submits form
 *
 * @param {String} redirect
 */
submit: function (redirect) {
    var additional = collectData(this.additionalFields),
        source = this.source;

    _.each(additional, function (value, name) {
        source.set('data.' + name, value);
    });

    source.save({
        redirect: redirect,
        ajaxSave: this.ajaxSave,
        ajaxSaveType: this.ajaxSaveType,
        response: {
            data: this.responseData,
            status: this.responseStatus
        },
        attributes: {
            id: this.namespace
        }
    });
},
Как вы можете видеть из этого кода, html-форма со всеми ее поля не отправляются. Однако this.source и this.additionalFields отправляются, но ваш элемент не включен в них, потому что он объявлен неправильно.
ОБНОВЛЕНИЕ ОТ 08.23.2016
Вот пример того, как добавить набор полей из нашего блога. Вы можете прочитать полную статью, перейдя по ссылке ниже:
Источник: Простой способ добавить набор полей с полями в форму пользовательского интерфейса :
Добавьте содержимое: метаданные формы пользовательского интерфейса и виртуальный тип для его дополнение.
Создайте файл
app/code/Vendor/Product/etc/adminhtml/di.xml. Мы собираемся поместить модификатор внутрь:<?xml version="1.0"?> <config xmlns:xsi="http://www.w3.org/2001/XMLSchema-instance" xsi:noNamespaceSchemaLocation="urn:magento:framework:ObjectManager/etc/config.xsd"> <virtualType name="Magento\Catalog\Ui\DataProvider\Product\Form\Modifier\Pool"> <arguments> <argument name="modifiers" xsi:type="array"> <item name="custom-fieldset" xsi:type="array"> <item name="class" xsi:type="string">Vendor\Product\Ui\DataProvider\Product\Form\Modifier\CustomFieldset</item> <item name="sortOrder" xsi:type="number">10</item> </item> </argument> </arguments> </virtualType> </config>Теперь создайте файл модификатора (
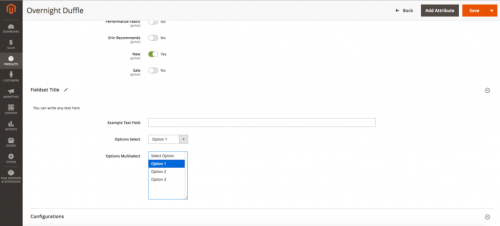
app/code/Vendor/Product/Ui/DataProvider/Product/Form/Modifier/CustomFieldset.php) с пользовательским набором полей для страницы редактирования продукта и заполните его полями:<?php namespace Vendor\Product\Ui\DataProvider\Product\Form\Modifier; use Magento\Catalog\Model\Locator\LocatorInterface; use Magento\Catalog\Ui\DataProvider\Product\Form\Modifier\AbstractModifier; use Magento\Framework\Stdlib\ArrayManager; use Magento\Framework\UrlInterface; use Magento\Ui\Component\Container; use Magento\Ui\Component\Form\Fieldset; use Magento\Ui\Component\Form\Element\DataType\Number; use Magento\Ui\Component\Form\Element\DataType\Text; use Magento\Ui\Component\Form\Element\Input; use Magento\Ui\Component\Form\Element\Select; use Magento\Ui\Component\Form\Element\MultiSelect; use Magento\Ui\Component\Form\Field; class CustomFieldset extends AbstractModifier { // Components indexes const CUSTOM_FIELDSET_INDEX = 'custom_fieldset'; const CUSTOM_FIELDSET_CONTENT = 'custom_fieldset_content'; const CONTAINER_HEADER_NAME = 'custom_fieldset_content_header'; // Fields names const FIELD_NAME_TEXT = 'example_text_field'; const FIELD_NAME_SELECT = 'example_select_field'; const FIELD_NAME_MULTISELECT = 'example_multiselect_field'; /** * @var \Magento\Catalog\Model\Locator\LocatorInterface */ protected $locator; /** * @var ArrayManager */ protected $arrayManager; /** * @var UrlInterface */ protected $urlBuilder; /** * @var array */ protected $meta = []; /** * @param LocatorInterface $locator * @param ArrayManager $arrayManager * @param UrlInterface $urlBuilder */ public function __construct( LocatorInterface $locator, ArrayManager $arrayManager, UrlInterface $urlBuilder ) { $this->locator = $locator; $this->arrayManager = $arrayManager; $this->urlBuilder = $urlBuilder; } /** * Data modifier, does nothing in our example. * * @param array $data * @return array */ public function modifyData(array $data) { return $data; } /** * Meta-data modifier: adds ours fieldset * * @param array $meta * @return array */ public function modifyMeta(array $meta) { $this->meta = $meta; $this->addCustomFieldset(); return $this->meta; } /** * Merge existing meta-data with our meta-data (do not overwrite it!) * * @return void */ protected function addCustomFieldset() { $this->meta = array_merge_recursive( $this->meta, [ static::CUSTOM_FIELDSET_INDEX => $this->getFieldsetConfig(), ] ); } /** * Declare ours fieldset config * * @return array */ protected function getFieldsetConfig() { return [ 'arguments' => [ 'data' => [ 'config' => [ 'label' => __('Fieldset Title'), 'componentType' => Fieldset::NAME, 'dataScope' => static::DATA_SCOPE_PRODUCT, // save data in the product data 'provider' => static::DATA_SCOPE_PRODUCT . '_data_source', 'ns' => static::FORM_NAME, 'collapsible' => true, 'sortOrder' => 10, 'opened' => true, ], ], ], 'children' => [ static::CONTAINER_HEADER_NAME => $this->getHeaderContainerConfig(10), static::FIELD_NAME_TEXT => $this->getTextFieldConfig(20), static::FIELD_NAME_SELECT => $this->getSelectFieldConfig(30), static::FIELD_NAME_MULTISELECT => $this->getMultiSelectFieldConfig(40), ], ]; } /** * Get config for header container * * @param int $sortOrder * @return array */ protected function getHeaderContainerConfig($sortOrder) { return [ 'arguments' => [ 'data' => [ 'config' => [ 'label' => null, 'formElement' => Container::NAME, 'componentType' => Container::NAME, 'template' => 'ui/form/components/complex', 'sortOrder' => $sortOrder, 'content' => __('You can write any text here'), ], ], ], 'children' => [], ]; } /** * Example text field config * * @param $sortOrder * @return array */ protected function getTextFieldConfig($sortOrder) { return [ 'arguments' => [ 'data' => [ 'config' => [ 'label' => __('Example Text Field'), 'formElement' => Field::NAME, 'componentType' => Input::NAME, 'dataScope' => static::FIELD_NAME_TEXT, 'dataType' => Number::NAME, 'sortOrder' => $sortOrder, ], ], ], ]; } /** * Example select field config * * @param $sortOrder * @return array */ protected function getSelectFieldConfig($sortOrder) { return [ 'arguments' => [ 'data' => [ 'config' => [ 'label' => __('Options Select'), 'componentType' => Field::NAME, 'formElement' => Select::NAME, 'dataScope' => static::FIELD_NAME_SELECT, 'dataType' => Text::NAME, 'sortOrder' => $sortOrder, 'options' => $this->_getOptions(), 'visible' => true, 'disabled' => false, ], ], ], ]; } /** * Example multi-select field config * * @param $sortOrder * @return array */ protected function getMultiSelectFieldConfig($sortOrder) { return [ 'arguments' => [ 'data' => [ 'config' => [ 'label' => __('Options Multiselect'), 'componentType' => Field::NAME, 'formElement' => MultiSelect::NAME, 'dataScope' => static::FIELD_NAME_MULTISELECT, 'dataType' => Text::NAME, 'sortOrder' => $sortOrder, 'options' => $this->_getOptions(), 'visible' => true, 'disabled' => false, ], ], ], ]; } /** * Get example options as an option array: * [ * label => string, * value => option_id * ] * * @return array */ protected function _getOptions() { $options = [ 1 => [ 'label' => __('Option 1'), 'value' => 1 ], 2 => [ 'label' => __('Option 2'), 'value' => 2 ], 3 => [ 'label' => __('Option 3'), 'value' => 3 ], ]; return $options; } }
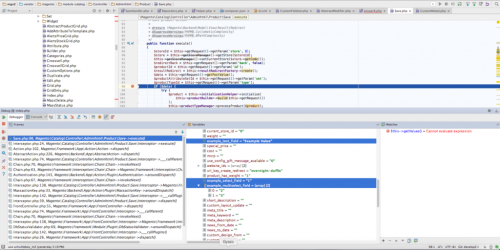
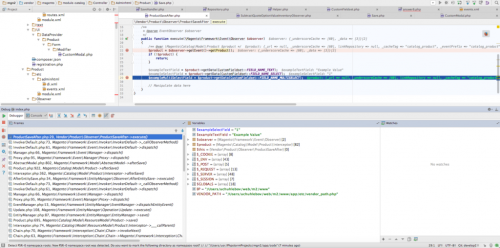
Сохранение данных происходит внутри файла контроллера продукта
vendor/magento/module-catalog/Controller/Adminhtml/Product/Save.phpв основном методе выполнения. Если все было сделано правильно таким образом, тогда наши данные будут правильно отображаться во входных данных данные этого метода:
Примечание. Если у вашего продукта изначально нет этих атрибутов , вам следует сохранить их вручную. Вы можете сделать это в наблюдателе.
Во-первых, объявите об этом в
app/code/Vendor/Product/etc/adminhtml/events.xmlфайл (мы используем область adminhtml, потому что форма не существует в интерфейсе):<?xml version="1.0"?> <config xmlns:xsi="http://www.w3.org/2001/XMLSchema-instance" xsi:noNamespaceSchemaLocation="urn:magento:framework:Event/etc/events.xsd"> <event name="catalog_product_save_after"> <observer name="save_example_data" instance="Vendor\Product\Observer\ProductSaveAfter" /> </event> </config>Затем создайте класс наблюдателя, на который мы указали в атрибуте экземпляра –
app/code/Vendor/Product/Observer/ProductSaveAfter.php:<?php namespace Vendor\Product\Observer; use \Magento\Framework\Event\ObserverInterface; use \Magento\Framework\Event\Observer as EventObserver; use Vendor\Product\Ui\DataProvider\Product\Form\Modifier\CustomFieldset; class ProductSaveAfter implements ObserverInterface { /** * @param EventObserver $observer */ public function execute(\Magento\Framework\Event\Observer $observer) { /** @var \Magento\Catalog\Model\Product $product */ $product = $observer->getEvent()->getProduct(); if (!$product) { return; } $exampleTextField = $product->getData(CustomFieldset::FIELD_NAME_TEXT); $exampleSelectField = $product->getData(CustomFieldset::FIELD_NAME_SELECT); $exampleMultiSelectField = $product->getData(CustomFieldset::FIELD_NAME_MULTISELECT); // Manipulate data here } }Данные в наблюдатель:
Теперь вы можете вызвать свою собственную модель из наблюдателя и сохранить в ней данные или изменить ее по своему усмотрению.
Будь осторожен! Если сохранение вашей модели связано с сохранением продукта, то это может привести к повторению.
Чтобы сохранить поле продукта в пользовательской таблице, вы можете следовать логике цены уровня. Magento сохранит цену уровня с помощью серверной пользовательской модели цены уровня. Мы можем следовать той же логике для нашего пользовательского поля/атрибута. Для сохранения атрибута в пользовательской таблице вам необходимо создать пользовательский атрибут и предоставить его серверную модель. Бэкэнд-модель будет проверять, сохранять и повторно использовать атрибут. Вы можете выполнить следующие действия.
Шаг 1. Создайте атрибут продукта
<?php
namespace Magentoins\TestAttribute\Setup;
use Magento\Eav\Setup\EavSetup;
use Magento\Eav\Setup\EavSetupFactory;
use Magento\Framework\Setup\InstallDataInterface;
use Magento\Framework\Setup\ModuleContextInterface;
use Magento\Framework\Setup\ModuleDataSetupInterface;


class InstallData implements InstallDataInterface

{
    private $eavSetupFactory;
    public function __construct(EavSetupFactory $eavSetupFactory)
    {
        $this->eavSetupFactory = $eavSetupFactory;
    }

    /**
     * {@inheritdoc}
     * @SuppressWarnings(PHPMD.ExcessiveMethodLength)
     */
    public function install(ModuleDataSetupInterface $setup, ModuleContextInterface $context)
    {
        /** @var EavSetup $eavSetup */
        $eavSetup = $this->eavSetupFactory->create(['setup' => $setup]);

        /**
         * Add attributes to the eav/attribute
         */

        $eavSetup->addAttribute(
            \Magento\Catalog\Model\Product::ENTITY,
            'test_attribute',
            [
                'type' => 'int',
                'backend' => 'Magentoins\TestAttribute\Model\Product\Attribute\Backend\TestAttribute',
                'frontend' => '',
                'label' => 'Test Attribute',
                'input' => '',
                'class' => '',
                'source' => '',
                'global' => \Magento\Catalog\Model\Resource\Eav\Attribute::SCOPE_GLOBAL,
                'visible' => true,
                'required' => false,
                'user_defined' => false,
                'default' => 0,
                'searchable' => false,
                'filterable' => false,
                'comparable' => false,
                'visible_on_front' => false,
                'used_in_product_listing' => true,
                'unique' => false,
                'apply_to' => ''
            ]
        );
    }
}
Шаг 2. Создайте серверную модель для пользовательского атрибута продукта, которая поможет в проверке, сохранении и извлечении значения атрибута
<?php
namespace Magentoins\TestAttribute\Model\Product\Attribute\Backend;

class TestAttribute extends \Magento\Catalog\Model\Product\Attribute\Backend\Tierprice
{
  protected $_productAttributeBackendTestAttribute;
  /**
   * Website currency codes and rates
   *
   * @var array
   */
  protected $_rates;

  protected $_helper;

  protected $eavConfig;

  public function __construct(
      \Magento\Directory\Model\CurrencyFactory $currencyFactory,
      \Magento\Store\Model\StoreManagerInterface $storeManager,
      \Magento\Catalog\Helper\Data $catalogData,
      \Magento\Framework\App\Config\ScopeConfigInterface $config,
      \Magento\Framework\Locale\FormatInterface $localeFormat,
      \Magento\Catalog\Model\Product\Type $catalogProductType,
      \Magento\Customer\Api\GroupManagementInterface $groupManagement,
      \Magento\Catalog\Model\ResourceModel\Product\Attribute\Backend\Tierprice $productAttributeTierprice,
      \Magentoins\TestAttribute\Model\ResourceModel\Product\Attribute\Backend\TestAttribute $productAttributeBackendFixedprices,
      \Magentoins\TestAttribute\Helper\Data $helperData,
      \Magento\Eav\Model\Config $eavConfig
  ) {
    parent::__construct(
        $currencyFactory,
        $storeManager,
        $catalogData,
        $config,
        $localeFormat,
        $catalogProductType,
        $groupManagement,
        $productAttributeTierprice
    );
    $this->_productAttributeBackendTestAttribute = $productAttributeBackendTestAttribute;

  }

  /**
   * Retrieve resource instance
   *
   */
  protected function _getResource()
  {
    return $this->_productAttributeBackendTestAttribute;
  }

  public function getAttribute()
  {
    $attribute = $this->eavConfig->getAttribute('catalog_product', 'test_attribute');
    return $attribute;
  }
  /**
   * Validate test_attribute data
   *
   */
  public function validate ($object)
  {
    $attribute = $this->getAttribute();
    $attr = $object->getData($attribute->getName());
    if (empty($attr)) {
      return true;
    }

    return true;
  }

  /**
   * Assign test_attribute to product data
   */
  public function afterLoad ($object)
  {
    /*$data is from your custom table*/
    $data = $this->_getResource()->loadTestAttributeData($object->getId(), $websiteId);
    $object->setData($this->getAttribute()->getName(), $data);
    $object->setOrigData($this->getAttribute()->getName(), $data);

    $valueChangedKey = $this->getAttribute()->getName() . '_changed';
    $object->setOrigData($valueChangedKey, 0);
    $object->setData($valueChangedKey, 0);

    return $this;
  }

  /**
   * After Save Attribute manipulation
   */
  public function afterSave ($object)
  {
    $websiteId = $this->_storeManager->getStore($object->getStoreId())->getWebsiteId();
    $isGlobal = $this->getAttribute()->isScopeGlobal() || $websiteId == 0;

    $testAttribute = $object->getData($this->getAttribute()->getName());

    /*Save attribute value in custom table with the help of resource model*/

    $this->_getResource()->saveTestAttributeData($testAttribute);

    return $this;
  }

  public function beforeSave ($object)
  {
    parent::beforeSave($object);
  }

}
Шаг 2. Модель ресурсов для сохранения и извлечения значения атрибута из пользовательской таблицы
<?php
namespace Magentoins\TestAttribute\Model\ResourceModel\Product\Attribute\Backend;

use Magento\Catalog\Model\ResourceModel\Product\Attribute\Backend\Tierprice;

/**
 * @author
 */
class TestAttribute extends Tierprice
{
    /**
     * Initialize connection and define main table
     *
     * @return void
     */
    protected function _construct()
    {
        $this->_init('magentoins_product_entity_testAttribute', 'value_id');
    }

    /**
     * Load Fixed Prices for product
     *
     * @param int $productId
     * @return Designnbuy_Fixedprices_Model_Mysql4_fixedprices
     */
    public function loadTestAttributeData($productId, $websiteId = null)
    {
        $connection = $this->getConnection();
        $columns = array (
            'test_attribute' => $this->getIdFieldName()
        );
        $select = $connection->select()
            ->from($this->getMainTable(), $columns)
            ->where('entity_id=?', $productId)
            ->order('order');

        if (!is_null($websiteId)) {
            if ($websiteId == '0') {
                $select->where('website_id=?', $websiteId);
            } else {
                $select->where('website_id IN(?)', array ('0', $websiteId
                ));
            }
        }

        return $connection->fetchAll($select);
    }

    public function saveTestAttributeData(\Magento\Framework\DataObject $attributeObject)
    {
        $connection = $this->getConnection();
        $data = $this->_prepareDataForTable($attributeObject, $this->getMainTable());

        if (!empty($data[$this->getIdFieldName()])) {
            $where = $connection->quoteInto($this->getIdFieldName() . ' = ?', $data[$this->getIdFieldName()]);
            unset($data[$this->getIdFieldName()]);
            $connection->update($this->getMainTable(), $data, $where);
        } else {
            $connection->insert($this->getMainTable(), $data);
        }
        return $this;
    }
}